Message Components#
Message components are the interactive buttons and select menus you'll see on messages sent by bots.
This guide is only going to cover using Yuyo's components client to make and handle components as, while you can use components with just Hikari, higher level clients make it a lot easier and are the recommended approach.
Making components#
class LinkColumn(components.ActionColumnExecutor):
    @components.as_interactive_button(hikari.ButtonStyle.DANGER)
    async def on_button(self, ctx: components.Context) -> None:
        await ctx.respond("Button pressed")

    link_button = components.link_button("https://example.com/yee")
The above examples shows using yuyo.components.ActionColumnExecutor to declare and handle message buttons.
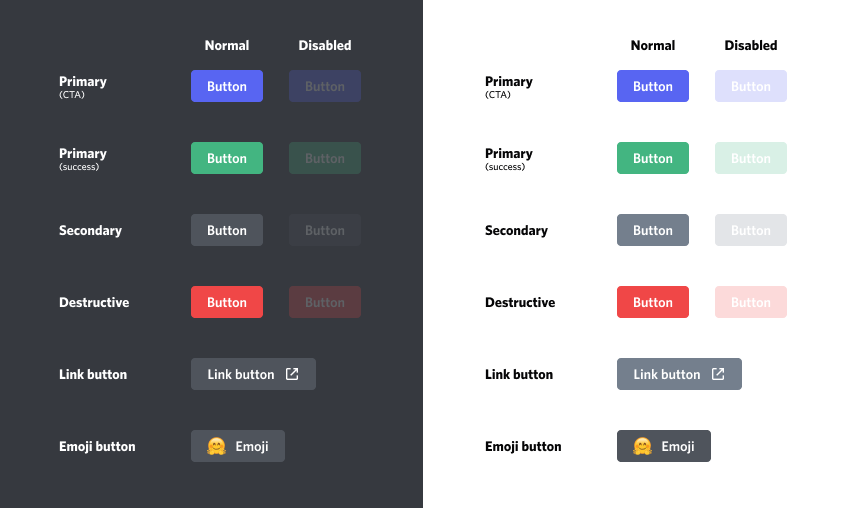
There are several different "styles" of buttons, as shown above. Most button styles are interactive (meaning that the bot will be told when they're pressed) except link buttons, which opens the relevant link in a browser for the user who clicked it.
class SelectColumn(components.ActionColumnExecutor):
    @components.as_channel_menu
    async def on_channel_menu(self, ctx: components.Context) -> None:
        await ctx.respond(f"Selected {len(ctx.selected_channels)} channels")

    @components.with_option("borf", "dog")
    @components.with_option("meow", "cat")
    @components.with_option("label", "value")
    @components.as_text_menu(min_values=0, max_values=3)
    async def on_text_menu(self, ctx: components.Context) -> None:
        await ctx.respond("Animals: " + ", ".join(ctx.selected_texts))

    @components.as_role_menu
    async def on_role_menu(self, ctx: components.Context) -> None:
        roles = ", ".join(role.name for role in ctx.selected_roles.values())
        await ctx.respond(f"Selected roles: {roles}")

    @components.as_user_menu
    async def on_user_menu(self, ctx: components.Context) -> None:
        users = ", ".join(map(str, ctx.selected_users.values()))
        await ctx.respond(f"Selected users: {users}")

    @components.as_mentionable_menu
    async def on_mentionable_menu(self, ctx: components.Context) -> None:
        role_count = len(ctx.selected_roles)
        user_count = len(ctx.selected_users)
        await ctx.respond(f"Selected {user_count} users and {role_count} roles")
Message components also include select menus. These allow users to select 1 or more options (dependent on the configured min_values and max_values), telling the bot which options they've picked. Most select menu types will pre-populate options for users (whether that be users, channels, or roles), but text select menus require the bot to pre-define up to 25 string options for it.
By default min_values is set to 0 and max_values is set to 1, but max_values can be set to up to 25 to allow the user to select multiple options before finalising (sending) the interaction.
as_channel_menu allows you to limit the channel types which can be selected.
Rows#
While ActionColumnExecutor abstracts away building individual action rows, you still need to be aware of the restrictions around them:
- A message can have up to 5 rows.
- A row can only contain one select menu.
or
- A row can contain up to 5 buttons (regardless of the style).
ActionColumnExecutor will always append components to the last row if possible or add a new row. This means that if your second row only has 1 button but there's a 3rd which is a select menu then an add button call would add a 4th row for the new button.
Sending components#
async def command(
ctx: tanjun.abc.Context, client: alluka.Injected[components.Client]
) -> None:
component = SelectColumn()
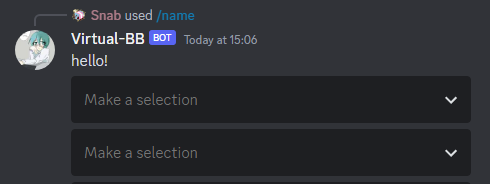
message = await ctx.respond(
"hello!", components=component.rows, ensure_result=True
)
client.register_executor(component, message=message)
As shown above, sending the components in an action column is easy. First you pass ActionColumnExecutor.rows as components=executor.rows to the create message method, then you call ComponentClient.register_executor with the created message and executor to make it listen for interactions.
And now for something completely different#
This guide only covers one of Yuyo's different approaches for declaring and handling components, only giving a basic overview. For more information on Yuyo's components functionality see its usage guide.